Painting Exposed Wood Beams, Brackets, and Pergola Elements on a Home Exterior
Home / Blog
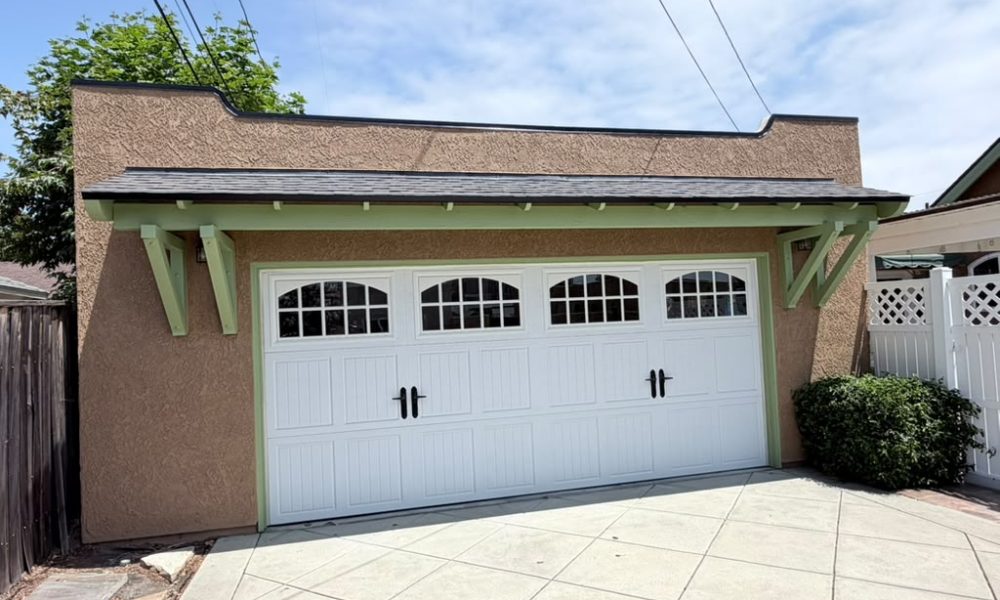
Exposed wood beams, decorative brackets, and pergola overhangs are among the most visually impactful elements on a home exterior — and among the most neglected when it comes time to repaint. Homeowners often focus on the large stucco or siding surfaces and treat the wood structural elements as afterthoughts, touching them up quickly or skipping them entirely. The result is an exterior that looks unfinished: the large surfaces look fresh, but the wood details read as aged, weathered, or mismatched.
Done correctly, painting exposed wood beams and brackets is one of the highest-return investments in a full exterior update. These elements are at eye level, they frame the most prominent architectural features — garage openings, entry overhangs, covered porches — and their color has an outsized effect on how the entire facade reads from the street.
Why Exposed Wood Elements Need Dedicated Attention
Wood behaves differently from stucco, siding, or masonry under paint — and the conditions that exterior wood faces in Southern California are particularly demanding.
Sun exposure is relentless on beams and brackets that extend beyond the roofline. They receive direct UV on multiple sides simultaneously, which breaks down both the wood surface and the paint film faster than on walls that are partially shielded by the roof overhang. Coastal Ventura also sees enough temperature variation between day and night — and enough marine layer moisture — that exposed wood expands and contracts regularly. Paint applied without proper preparation or with the wrong product can crack, peel, or lift along the wood grain within a few seasons.
Wood also presents application challenges that stucco doesn’t. Open grain, knots, end grain sections, and layers of old paint or stain each require a different approach during preparation to ensure the new paint bonds correctly and covers evenly.
Assessing Condition Before Any Paint Goes On
A thorough condition check tells you what preparation is actually required — and skipping it is where most DIY repaints of wood elements go wrong.
Peeling or flaking paint indicates adhesion failure, usually from moisture intrusion, incompatible products, or inadequate prep on a prior paint job. All loose material must come off before repainting. Surface-level checking or cracking along the grain is normal weathering and can be addressed with primer and flexible topcoats, but deep cracks that penetrate the wood signal moisture damage and may require wood consolidant or section replacement.
Wood that has gone gray or silver has oxidized and lost the surface fibers that create good paint adhesion — light sanding is required to expose fresh wood before primer. Knots and resinous sections that bleed yellow or brown staining through existing paint need a shellac-based stain-blocking primer before topcoats. And wood that was previously stained rather than painted needs a bonding primer, since stain soaks into the wood grain and interferes with standard paint adhesion.
Surface Preparation: Where Longevity Is Decided
Preparation accounts for the majority of how long a paint job on exterior wood will last. Cutting corners here produces results that fail quickly, regardless of how good the topcoat is.
Cleaning comes first — exposed wood beams and brackets accumulate dirt, mildew, and environmental residue that interfere with adhesion. A low-pressure wash with mild detergent removes surface contaminants. Active mildew growth needs a diluted bleach solution before washing; painting over active mildew traps it under the film and accelerates failure.
All loose, peeling, or flaking paint gets scraped and sanded off — not painted over. Feather the edges of any remaining paint so there’s no hard ridge between painted and bare wood. A light overall sanding opens the grain and improves adhesion across the whole surface.
End grain sections — the cut ends of beams and the tops of vertical brackets — absorb moisture faster than face grain and are the most common entry point for water that causes paint failure. These areas receive an extra coat of primer before the full prime coat goes on. Gaps between wood elements and adjacent stucco or masonry should be filled with paintable exterior caulk and allowed to cure fully before priming.
Primer Selection for Exterior Wood
The right primer depends on the wood’s condition and what was previously on it — primer choice here is not interchangeable.
For bare or stripped wood, a high-quality exterior alkyd or oil-based wood primer penetrates the grain and creates the most durable bond. For wood with tannin bleed at knots or end grain, shellac-based primer is the most reliable barrier. For previously painted wood in sound condition, a bonding primer over lightly sanded existing paint gives the new topcoat the adhesion layer it needs.
Choosing the Right Topcoat for Sun and Salt Air
For exterior wood in Southern California, 100% acrylic exterior paint is the standard recommendation. Modern acrylic formulations stay flexible as wood expands and contracts, resist UV degradation better than older alkyd products, and hold color longer in high-sun environments. For elements in direct, unshielded sun — exposed beam tops, bracket faces — a premium acrylic with UV inhibitors outperforms standard acrylic over the course of a paint cycle.
Satin and semi-gloss sheens are the most practical for exterior wood structural elements. They’re easier to clean, more moisture-resistant than flat or eggshell, and make the wood details read as deliberate design elements from the street. Semi-gloss on top surfaces also sheds water more effectively, which reduces moisture intrusion at the most vulnerable faces.
Color Strategy: Making Wood Elements Work With the Overall Exterior
The color choice for exposed beams, brackets, and pergola elements often sets the tone for the entire exterior composition — these elements frame the most prominent openings on the home, and their color is visible from the street at eye level.
Painting them to match the primary trim color (typically white or cream) is the most straightforward approach. It unifies all painted wood on the home and lets the stucco or siding color take the lead. This works well when the wood elements are relatively small or when the goal is a clean, simple composition.
Using an accent color creates a three-color palette with real depth — particularly effective on Craftsman and bungalow-style homes where exposed structural wood is a defining architectural feature. Sage green, olive, deep forest green, warm brown, and slate blue are all established accent colors for exterior wood elements that connect the home to its landscape. Whatever color goes on the beams and brackets should be referenced somewhere else on the exterior — front door, shutters, or a siding accent panel. An accent that appears only on the structural wood reads as an isolated decision rather than a design choice.
Application Technique for Complex Wood Shapes
Beams, brackets, and pergola elements have multiple faces, angles, and orientations that require deliberate technique to paint evenly and completely.
Work from top to bottom and from back to front. On an overhead beam, paint the underside first, then the sides, then the top. On a bracket, paint the back face and inner angles before working outward. This order prevents wet paint from dripping onto already-finished surfaces.
Don’t skip the hidden faces — the back surfaces of brackets and the undersides of beams where they meet the wall are easy to miss and are often where paint failure starts first. Every face that will be exposed to weather needs primer and topcoat. Brushwork is typically more effective than spraying for wood structural elements with complex shapes, since a brush pushes paint into grain and into corners where spray coverage tends to be thin.
How Often Should Exterior Wood Elements Be Repainted?
In Ventura’s coastal environment, exposed wood structural elements typically need repainting every five to seven years with quality products and proper preparation. Elements in full, unshielded sun may need attention at the five-year mark; protected elements under a deep overhang can extend to eight years or more.
The reliable indicator is the condition of the paint film: when paint begins to check, fade significantly, or show adhesion failure at edges and end grain, it’s time to repaint. Waiting until paint is actively peeling means the wood surface has been exposed to moisture, which requires more preparation work to address correctly.
Ready to Update Your Exterior Wood Accents?
Exposed beams, brackets, and pergola elements deserve the same careful preparation and product selection as any other part of your exterior — and the right color choice for these elements can define the character of the entire facade. At RM Empire Painting, we handle the full scope of exterior painting in Ventura, CA, including the structural wood details that pull an update together.
Ready to give your home’s wood accents the attention they deserve? Contact RM Empire Painting for a free estimate and color consultation.
Our Services
Get A Free Quotes
Got any questions ? Feel free to call us !
Do you have any questions about our services or would you like to request a free estimate? Don’t hesitate to call us at (805) 746-5140. At RM Empire Painting we are always available to provide you with personalized advice and help you transform your spaces with the quality we are known for. Contact us today, we’ll be happy to assist you!

Whether you’re looking to refresh your home or enhance your business, our team of licensed and insured professionals is here to deliver exceptional results.
Our Services
Copyright ©2026 RM Empire Painting, All rights reserved. Powered by Orbis Advisers.